
Sunday, August 24, 2014
Fresh Off The Presses, 3D Illusion design tips!
Wednesday, March 19, 2014
The Grimnasty Show On The Rise!
music world stay tuned!
Next Episode: Under Par Disc Golf 3D

Grimnasty on I tunes
Sunday, November 3, 2013
How To Make Molds, Toys, & Resin Figurines, From Start To Finish!!!


Solomon here! I'm going to show you how to make toys and collectibles step by step from sculpting into creating a mold,casting and etching and painting process.
Supplies needed: Super Sculpey, 2 part rubber, cardboard, Xacto blade w/ extra blades. Bag of large rubber bands. Mold Ease release, Sealer, &
2 part plastic/resin.
Casting supplies can be found at http://smooth-on.com
1. First you want to take you sweet time and sculpt a cool piece, figurine, or whatnot out of Super Sculpey polymer clay.


After you finish the first half of the clay go back and smooth it as clean as possible this will insure that you have a nice seal with the mold comes together, usually un-smoothed clay will make for a crappy mold later so take your time...this is like changing diapers, don't rush take it easy!


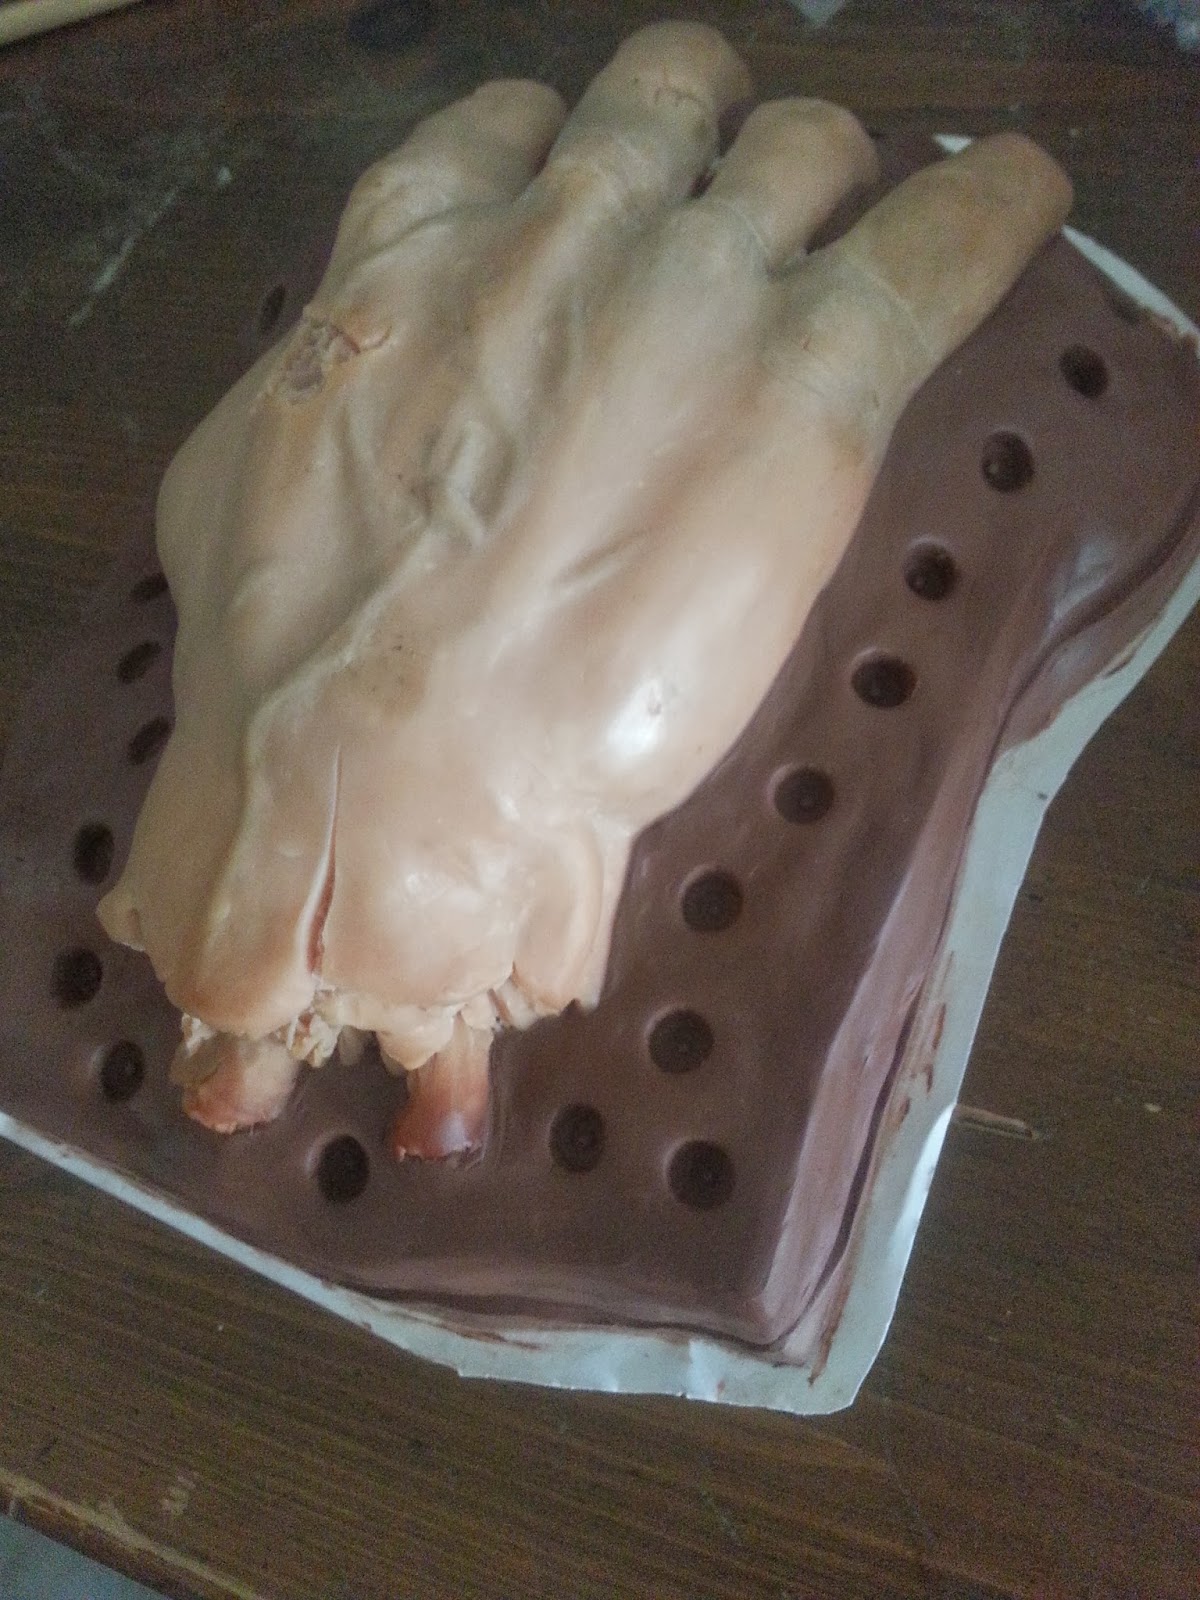
Next carefully take an end of a pen and push holes in the clay 1-2 inches away from the edge where the sculpt meets the clay so that you dont break the seal. This will ensure the rubber will not leak into the bottom part of the piece in this case the bottom part of the hand. The holes should only go a fraction of an inch deep.

3. Place this entire piece into your box. The walls of the box will hold in the rubber. And now its time for an important part...AIRFLOW!!!!!!!!!!!!! AIR FLOW, AIRFLOW, saves LIVES!!! Its all about airflow. You need to create tubes of negative space for air to travel to keep bubbles from getting trapped in you mold and ruining your cast.
The best way to do this is to get coffee straws, save yourself some headache and get these from Starbucks or McDonald's they don't sell them at Walmart, or grocery stores. SMH!


4. Next after a everything's in place you need you pour your rubber, usually 2 part mixed rubber found at http://smooth-on.com. Follow the mixing directions EXACTLY!!!! The next thing you'll do is spray a sealer and mold release from the same company over your piece and let dry dont pour the rubber when its wet...wait at least 15-20 minutes. It should dry to an oily residue when ready. Next pour the rubber as follows in part 5.
5. Time to pour, when doing this aim for the lowest point of the box and let the rubber fill up slowly, this pushes all of the air out from the bottom up ensure no bubbles get trapped in the rubber. Dont pour all over it will makes bubbles and ruin the mold....remember from the lowest point up. Wait until dry as according to instructions and then strip away the entire box and clay around the piece but DO NOT peel the hard rubber from the piece so BE CAREFUL!!!!!! Dont break the seal from the master to the rubber VERY IMPORTANT! When the box is stripped away it should look like this. Then you carefully pull out the clay around the piece.

 Once all of the clay is out you should see a flat box of rubber with a huge dip from the clay dome you made with a new positive male ending all around the first half. Once you have this clean from clay apply the release and sealer as before and pour into the huge dip to create the second half. To prevent spillage you may want to create another box around your rubber block with a lip right above the rubber your pouring into. In our case here the dip from the other side of the hand is so far down I only need to pour into the hole. After it drys pull out the master , straws, pour hole clay, box and all, you should be left with a positive and negative sides as shown.


After your mold is done strap on the rubber band to hold into place. Use alot of them to keep a good shape to the mold so it doesn't warp the mold. The more rubber bands and the thicker the molds rubber the better.


If you dont have airflow and you aren't doing a hand /machine tossed mold, you'll be looking at a crappy bubbled casting...and also the realization that your mold is worthless. AIRFLOW is the key!!!!!

7. Wash them in the sink or tub with dawn the warm water this will release oils on the surface that will prevent the paint from sticking to the surface. Let them soak for an hour or more...scrub them with a rag or toothbrush.

Or acrylic paints,.but before any of this happens get an etching primer. Automotive etching primer made to bond metals is the best for paint adhesion.

This stuff can be found at most auto stores, save the headache and just go to Auto Zone.
After these have a nice couple of coats let it set for an hour or so it can bond to the resin. Then paint your pieces as desired.


Saturday, October 12, 2013
Austin Art Boards Welcomes Serendipitous by Solomon Perry!

Monday, September 9, 2013
Austin Hip Hop Nightlife
Tired of trying to find the LIVEST hip hop events in Austin only to find out you missed it? Are you new to Austin? We have a treat for you, by signing in below you'll find out about the best hip hop shows in the ATX.
Saturday, September 7, 2013
Stop Stress & Anxiety in 7 Steps
Stress is a serious modern-day factor in everyone’s health, including men. Daily tension and emotional strain has been linked to heart disease, high blood pressure, migraine headaches, and many other chronic illnesses. Men experiencing high levels of stress can also experience anxiety, insomnia, fatigue, and depression, and are very likely to turn to unhealthy habits like smoking, drinking, overeating, and/or drug abuse to help deal with that stress.
 Illustration by Solomon Perry
Why Is Stress So Dangerous?
Stress is harmful because it presses biological buttons inside men that have long outlived their usefulness. When a man had to battle wild animals to save his family, that stress prompted certain fight-or-flight responses within his body:
• The heart rate soared to send more blood to the brain, improving quick decision-making.
• Blood shunted into the large muscles of the arms and legs to provide more strength and speed, and away from the gut.
• Blood sugar rose to provide more fuel for quick energy.
• Blood began to clot more quickly, to prevent blood loss from wounds or internal damage.
All of these natural emergency responses were necessary – at that time. But perpetually living in that same fight-or-flight response mode can be deadly, since it prevents the body from being able to take care of itself through normal and essential daily functions.
So, what’s a guy to do?
1. Sleep well. Good nutrition and 7 to 8 hours of sleep each night can help your body recover from past stress and be better prepared to deal with new stress. Avoid caffeine and other stimulants that might promote stress and sleeplessness. It’s hard, but try to limit your alcohol, which might deepen any depression you may be feeling.
2. Exercise regularly. Exercise has been proven to reduce stress levels, helping you burn off pent-up energy and tension. It also improves overall health.
3. Figure out the cause of your stress. Dealing with the problems that cause tension can relieve you of that stress. Inaction just allows it to build. Instead, talk to people and work on finding effective solutions. Also, ask for some assistance if you can’t meet all the demands placed on you.
4. Adjust your everyday behaviors. If possible, try to time your daily commute to avoid rush hour. Shop when you know the store won’t be packed with people. Cut down on the time you spend with people
who get on your nerves. Schedule your time well and determine the most important of the tasks you’re trying to handle, methodically completing those first, then moving on to less critical jobs. Resist trying to do multiple projects at once. Don’t overpromise, and give yourself time to finish the things you do agree to tackle.
5. Adopt a more positive attitude. Always looking on the sunny side sounds cliché, but it does work. Having a negative outlook can turn even the most minor annoyances into huge problems in your mind.
6. Accept the things you can’t change. There are going to be things in your life that you can’t control, no matter how hard you try. Instead, look for ways to enjoy uncontrollable circumstances (for example, if it’s snowing outside, have a snowball fight with your kids, or enjoy some hot chocolate and a good movie with your significant other).
7. Celebrate your victories. When you accomplish a personal goal or finish a major project, do something nice for yourself. It can be as simple as getting a massage or as extravagant as taking a weekend getaway. Celebrate your achievement before you jump into the next project.
Your outlook is such an important factor in how your body deals with stress. Following the above steps will help you put stress in perspective and start enjoying your life.
Monday, July 29, 2013
What Are The Phantazm Kids / Grimnasty Stickers About?

http://grimnasty.com http://youtube.com/grimnastytv http://facebook.com/grimnasty
BUY THIS T-SHIRT NOW: https://www.reverbnation.com/store/store/artist_903060?item_type=merchandise
Subscribe to:
Posts (Atom)